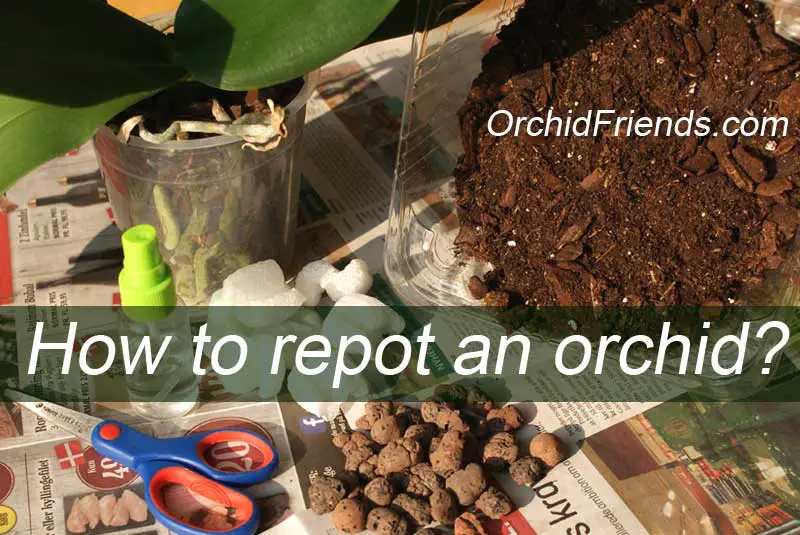
Repotting an orchid is slightly different to repotting a ‘normal’ houseplant. This is because most orchids are epiphytes, ‘air plants’, growing up high holding on to trees etc. ‘Normal’ houseplants are terrestrial plants, which means they grow from the ground.
For a plant to grow from the ground or in the air, requires a different type of root system. Air plants need a lot of air circulation around their roots, and therefore they would suffocate if planted in the ground. This is the reason why repotting orchids differs from repotting ‘normal’ houseplants.
Orchid keepers need to repot their orchids every 1-2 years, so it’s important to learn how to do it right. There are a few rules that apply, but once you’ve got the hang of it it’s pretty straightforward. And even fun!
Below, I will share everything I’ve learned about repotting orchids with you. And to point out before we start; we’re talking about the standard ‘moth orchids’ (Phalaenopsis orchids) in this article.
So how do you repot an orchid?
- Take the orchid out of its pot
- Remove the old potting medium
- Rinse the roots with lukewarm water
- Trim off any bad roots with sterilized scissors
- Spray with Hydrogen peroxide 3%
- Put the orchid in a clean pot
- Fill the pot with chosen orchid potting medium
- Water the orchid
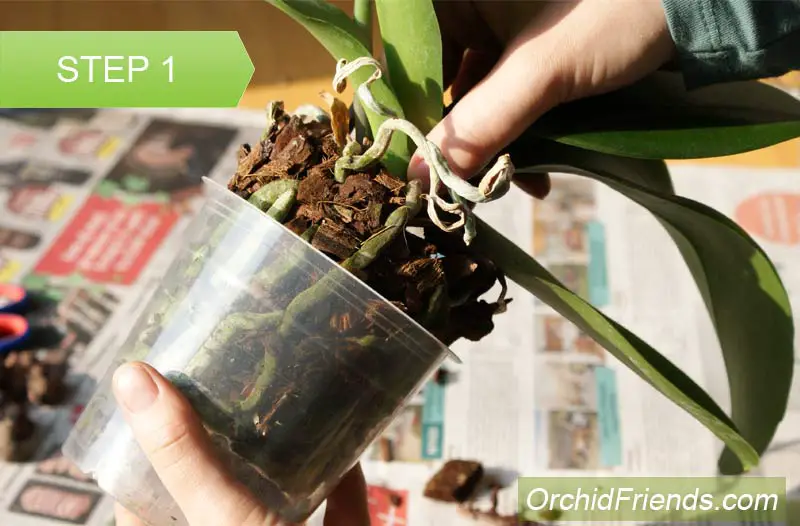
Step 1: Take the orchid out of its pot
Cover the surface you’re working on with old newspapers etc – there will be some mess! Find a good and firm place to hold the plant from, avoiding parts that can break easily (like new aerial roots and possible flower spikes).
Now gently pull out the orchid out of its old pot. If there are roots that are stuck to the pot, gently wiggle them to loosen up.
Take the time it needs to avoid causing any damage. I’ve experienced if I do this when I’m in a hurry, roots can accidentally break.
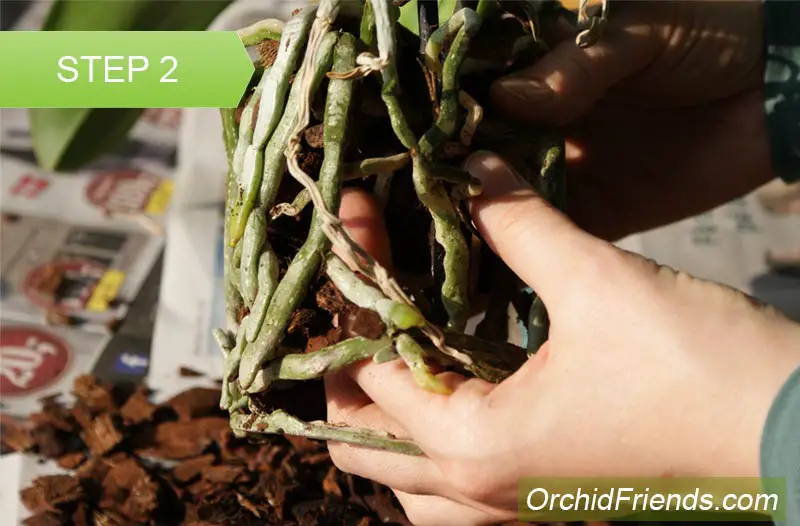
Step 2: Remove the old potting medium
Some of the old potting medium probably fell out already while you pulled the orchid out of its pot.
Now remove the rest manually by gently shaking and touching the roots to help loosen up the old medium. If there are bark pieces that seem impossible to remove without damaging the root, just let them be for now – I will advice how to deal with them in the next step.
Just clean the roots as well as you can now, removing all the lose bits. Take your time and be gentle when touching the roots.
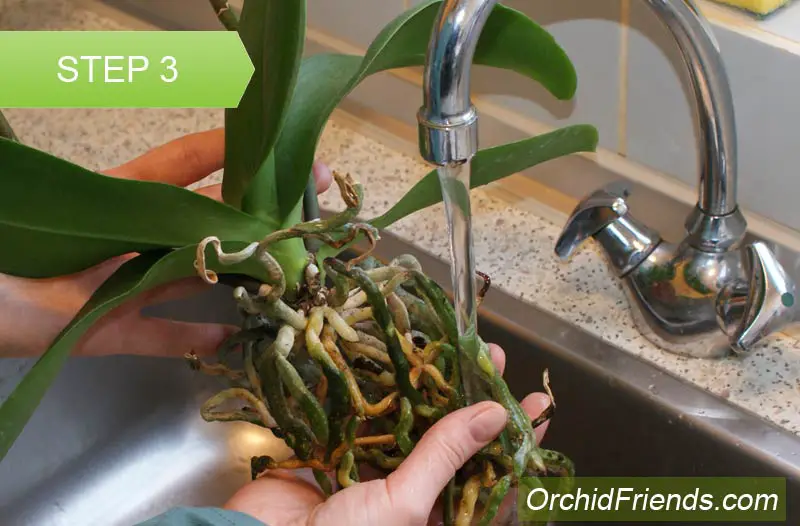
Step 3: Rinse the roots with lukewarm water
Now that the roots have been cleaned off old potting medium, give them a good rinse under a running tap using lukewarm water. This is just to clean them and make them more flexible.
Avoid getting any water in the crown of the plant – if this happens, however, you can dry it with some tissue paper.
Just stick the corner of the paper in-between the leaves where the water went; hold it there while it sucks out the water. Repeat if necessary, until dry.
If there were some old bark pieces ‘glued’ to the roots and they didn’t come off even after rinsing, you can soak the roots in lukewarm water – this usually helps remove even the most stubborn pieces. Start with 10-15 minutes of soaking first and see if that works. Increase the time if needed.
(Too much soaking doesn’t harm them, so you can even leave them in water while you do something else)
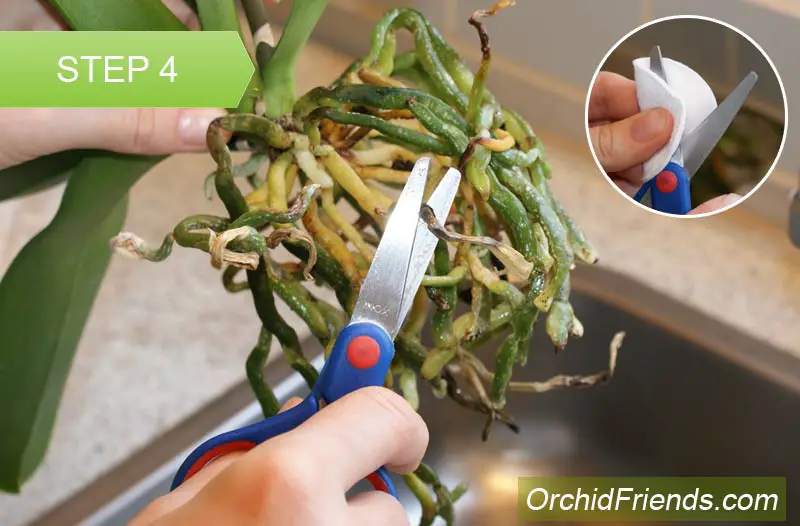
Step 4: Trim off any bad roots with sterilized scissors
Now that the roots are nice and clean, it’s time to inspect the root condition. This will give you insight to your orchid care – if most of the roots are dry or mushy, and this isn’t a brand new orchid you just brought home from the shop, it indicates you need to adjust your orchid care.
The bad roots are the result of e.g. not enough water, too much water, not enough air-circulation, etc. If most of the roots look nice and healthy, though, you know you’re doing something right and can stick to your orchid care regimen.
All the dry or mushy roots, however, need to be trimmed off – get rid of the ‘dead weight’!
Sterilize a pair of scissors/pruners with Hydrogen peroxide 3% and snip off the bad roots one by one.
If you’re not sure how roots are supposed to look like, I will add photos of good and bad roots to show you below.
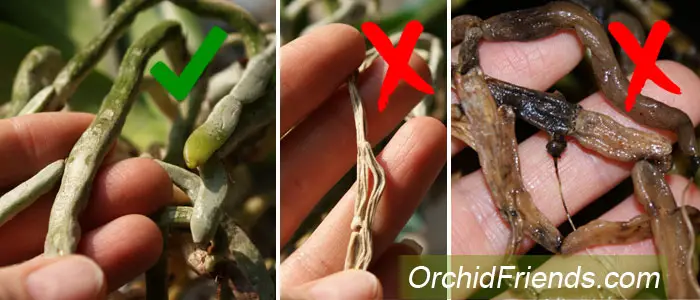
It’s important to always remember to sterilize the scissors/pruners before AND after using them to cut orchids. This is to avoid transferring any possible viruses or pests from orchid to orchid.
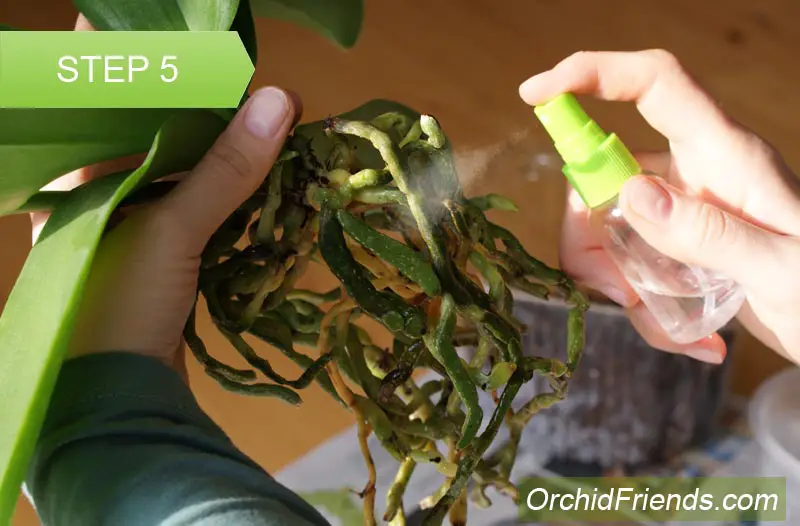
Step 5: Spray with Hydrogen peroxide 3%
Now that you have trimmed off all the bad roots, it’s time to disinfect by spraying the remaining roots with Hydrogen peroxide 3%. This strength of peroxide is safe to use on plants, but please don’t opt for stronger solutions to avoid causing any damage.
Spraying the roots with Hydrogen peroxide 3% eliminates any possible fungi and bacterial infections, even pests, as it works as an antiseptic.
I’ve been successfully using this method for years now, but you can skip this part if you don’t have any Hydrogen peroxide at home or simply don’t want to use it on your plants.
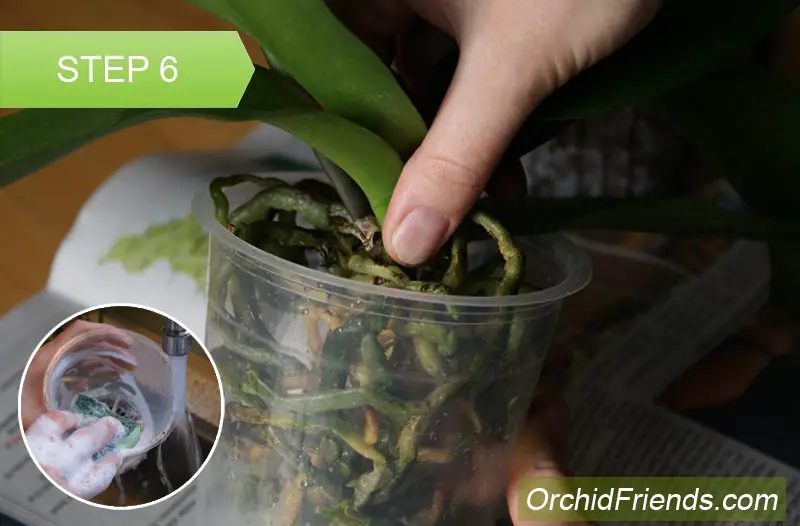
Step 6: Put the orchid in a clean pot
Now that the roots have been cleaned and disinfected, it’s time to put the plant back in the pot. You can use the old pot if the roots fit inside it – orchids don’t need much root space, so you don’t necessarily have to upsize every time you repot.
Just wash the pot with hot water and soap before using again. However, if you repotted the orchid because it outgrew the pot in the first place, and there weren’t many bad roots to trim off, then go for a size bigger orchid pot.
Gently place the orchid inside the clean pot. Make sure the roots fit well inside the pot, keeping the stem of the plant in the center of the pot.
Types of pots
The type of pot to use is a matter of preference. Personally, I still prefer clear plastic pots – not because of how they look like, but because it makes caring for orchids much easier.
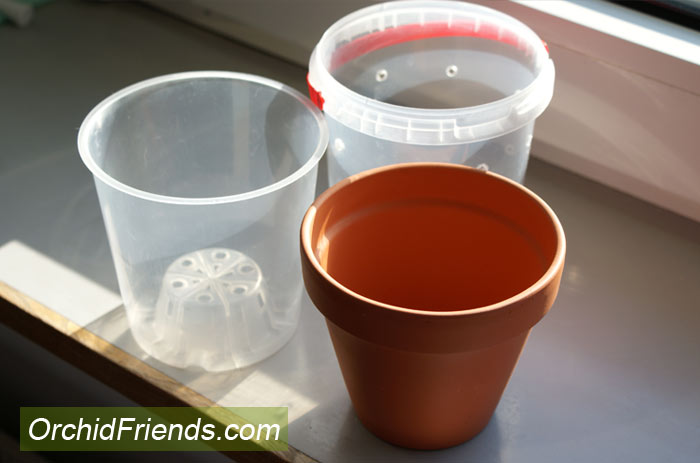
Through the clear plastic, you see immediately when the medium is dry and needs to be watered again. You can also see how the roots are doing if the potting medium has started to decompose if there are pests lurking around, or even possible salt deposits from too many minerals.
Clay pots are of course nicer on the eye, and they are a great option especially in more humid conditions because the medium dries out quicker in them.
You can reuse old clay pots, but many orchid lovers do this with caution as they can potentially transfer a virus from a sick orchid to the new one.
This happens rarely, but you can clean the clay pots before using them by washing them in hot soapy water and then baking them in the oven for 20-30 minutes in 300F (200C). This is to kill any viruses, bacteria or pests that can be stored in the clay.
Step 7: Fill the pot with chosen orchid potting medium
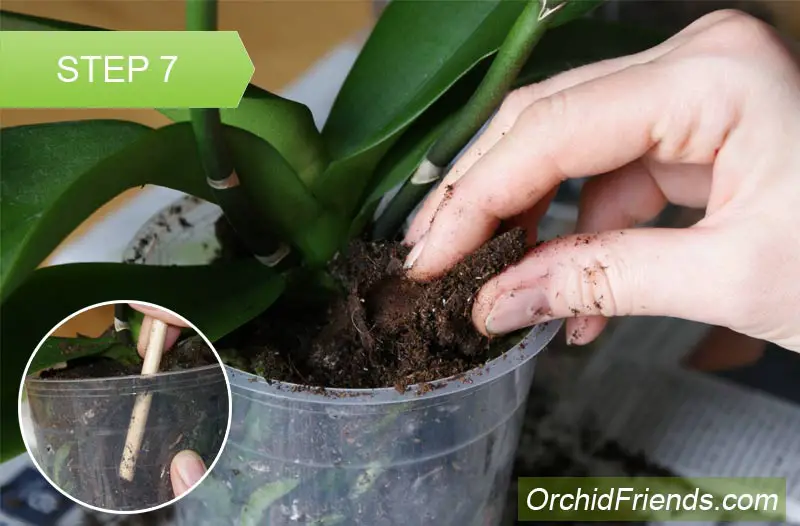
While gently-but-firmly holding the stem of the plant in the middle of the pot, start dropping chosen potting medium inside the pot.
Fill it up well so the orchid stands firmly in it, without the medium being too tight. If there are big air pockets inside the pot, use a stick to push down the potting medium into those spots.
It’s up to you what type of potting medium to use. You can always buy a ready orchid potting media mix too, if you’re not sure what to use. Or make your own mix, or use just one type of medium e.g. bark. Personally, I prefer ready bark mixes and I can also use some sphagnum moss.
For mini Phalaenopsis orchids I use more moss, and if an orchid is severely dehydrated or even lacks roots, then I can opt for moss-only because of the moss’ water retaining properties.
A TIP; Drop a few clay pebbles in the bottom of the pot for extra drainage and airflow – I always do this, and I seldom see any root problems in my orchids.
You can even take some packing peanuts and put a few of them in the pot, either in the bottom or in the middle of the pot. They’re lightweight and prevent potting medium from compressing, which suffocates the roots.
Step 8: Water the orchid
This is where advice from one orchid keeper to another will differ; others will tell you to water the plant immediately as usual, and others to leave it for a few days (or even up to a week) before watering again.
But as I’m here to share my experience with you and what has worked for me, I will advise you to go ahead and water the orchid now as usual.
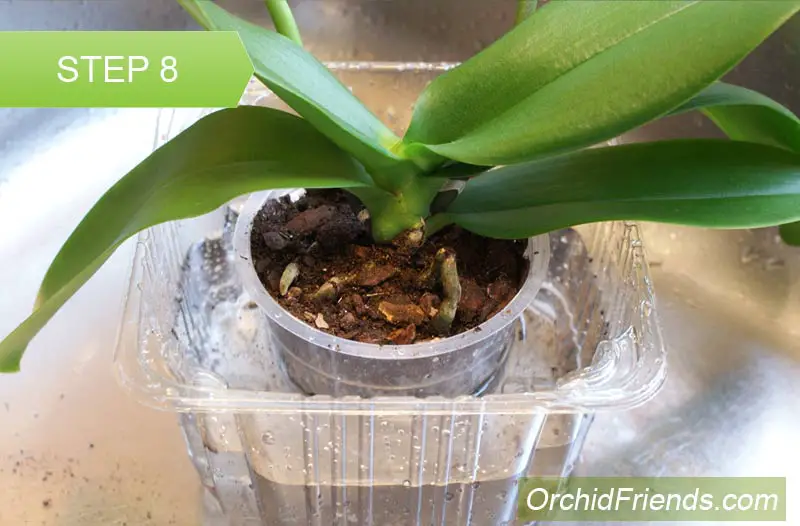
Water the orchid using the watering method you prefer, let the excess water drain out, and put the orchid back in its place.
Voilà! Your orchid has now been repotted!
If you are going to repot more orchids right after this one, remember that hygiene is important – always wash your hands in-between handling different orchids! Or use disposable plastic gloves.
This is to avoid transferring any possible viruses or pests from orchid to orchid. (Don’t worry, you can’t catch a virus from an orchid – but you can transfer one from orchid to orchid!)
What to do with air roots when repotting an orchid
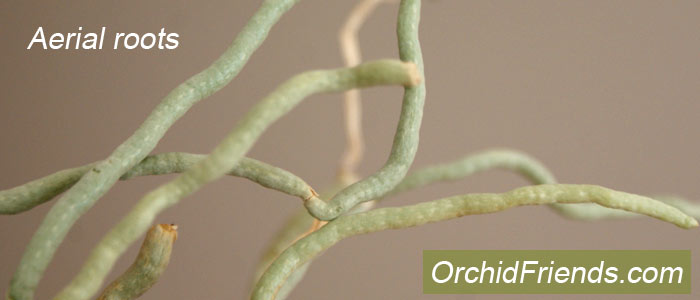
Air roots, or aerial roots, are the roots growing out of the pot in the air. Some orchids have a lot of them, and some less. They can look pretty wild if there are many of them and they’ve started to grow very long.
Their purpose is to catch humidity and even nutrition through the air. As orchids grow in tropical climates, the air is very humid there, so the plant can absorb plenty of moisture from the air alone even when it doesn’t rain.
Another purpose of aerial roots is to cling on to surfaces. If you have noticed, the aerial roots always grow away from the light source.
This is where the surface in nature would be, as orchids grow attached to tree trunks and branches etc.
Our way to keep orchids at home is quite different to their natural way to grow; we plant them in pots standing upright – in nature they would be sideways, holding on to surfaces, which is the reason why aerial roots end up just “hanging in the air” in domestic surroundings.
When repotting an orchid, just let the aerial roots be as they are. There’s no need to stick them inside the pot with the other roots.
If you tried to do that they would probably break anyway, as they can’t handle much bending.
So just focus on the roots that were already inside the pot – what was in the pot, goes back in the pot. What was in the air, can remain in the air.
I have heard of people trimming the aerial roots though if they’ve grown really long and wild. (The roots, not the people)
But this is only for visual purposes, if you find the look of them disturbing. Or if they have started to take up too much space. So even though it’s not something I do or even recommend, I have heard of some people doing it.
But just keep in mind that aerial roots do serve a purpose, and if your plant was ever to suddenly lose all its roots inside the pot, then the aerial roots are its lifeline.
Orchid repotting kit
Get prepared for the repotting on time. There are a few things that you need, which you can even keep in their own box ready to be used whenever it’s time to repot again.
What you need to repot an orchid
- Orchid potting media of choice
- A pot
- Scissors
- Hydrogen peroxide 3%
- Cotton pads
- A stick
- Plastic gloves
- Old newspapers
- Leca pebbles or packing peanuts
You need a new pot only when the orchid’s roots have outgrown the old pot. Otherwise, as I mentioned above, orchids don’t require much extra space in the pot, so it’s fine to reuse the old pot. Just wash it well with hot water and soap before using it again.
Regardless of what type of potting medium you’re using (bark or moss, or a mix of both), it’s a good idea to always have some clay pebbles or packing peanuts on hand too.
When you drop a handful of them in the bottom of the pot, you ensure the root tips won’t be standing in water even if some water gets trapped inside the pot. I keep both, clay pebbles and packing peanuts, in my orchid repotting kit.
If the Hydrogen peroxide 3% didn’t come ready in a spray bottle, fill up a small spray bottle with it.
The roots are so much easier to disinfect by spraying, than pouring the peroxide over them. You also waste less product this way. Keep the bottle in the repotting kit away from the sunlight which destroys it.
The cotton pads are for disinfecting the scissors/pruners before and after using them on orchids. But you can also wipe orchid leaves with them – I sometimes spray a little Hydrogen on a pad, and just give the leaves a quick wipe.
The stick is for pushing down the orchid medium to fill up air pockets during repotting – trust me, it’ll come in handy! (Even a pencil or a Chinese chopstick will do)
Old newspapers are the best to repot on, so have them in your kit too. Also a box of disposable plastic gloves!
Of course, if you don’t like plastic gloves then skip them – just wash your hands well in-between handling different orchids.
If you want more information on what kind of potting medium or pots to use, please see HERE
Final Words
I don’t know how many times I’ve repotted an orchid by now, but I can say it’s a big number! And it’s actually one of my favorite things to do with orchids because it gives that hands-on time with them. And not only that, but it also gives a chance to see how the root system is doing.
When your orchid care regimen is on the right track, it will show also in the roots. But if there are problems, don’t worry – use it as a learning opportunity, and fix whatever needs fixing.
It might all feel confusing in the beginning, but I’m here to share my knowledge and experience with you, and help you on the way!
Thank you for reading, and Happy Repotting!
Can you repot while blooming?
Hi Deb. Well, you can. Let’s say if you bring home a brand now orchid and want to repot it immediately, then go ahead and repot. That said, when you repot while in bloom, there is a slight risk the orchid can lose its bloom. It doesn’t happen every time, but sometimes it does (repotting is stressful for an orchid). So while you CAN repot while in bloom, if you absolutely don’t want to risk losing a single flower, then wait until the bloom is over.
Hi Irene, I’m happy to know there is a blog on Orchids and I’m very thankful for your time and sharing of your knowledge of Orchids. BTW, my name is Richie and my question is, what is the name of the potting soil that you used to repot? Instead of potting soil, I believed you called it potting medium? Are they the same soil and medium or are they totally different from each other. I’m new at this and I found an Orchids inside a trash can and it looked like it was still alive and well except that it had no bloom and it was inside a small trash can at my previous job. So I took it home and began watering it every few days or whenever I thought the plant needed it by watching how dry the pot looked. I have it next to my kitchen window by the sink and since I’ve had it buy the window, its showing signs of thriving growth. Anyways, if you can just answer my question about the name of what I use to pot with and possibly what name brand of Orchids potting media do you recommend. Thanks again for your awesome time!!!
Hi Richie!
Thank you for your nice comment and for saving that orchid from a trash can! That’s how I got my first orchid too, and the rest is history. 😉
The reason why people don’t use the word ‘soil’ about orchid potting mix, is because these orchids can’t grow in SOIL. They grow in bark or moss instead. So it’s just a use of word, to make sure people don’t accidentally start to plant their orchids in normal potting soil, which would suffocate the roots! (If that makes sense?)
You can call it potting media/medium/mix. (‘Media’ is used when it’s a mix of different components like bark and moss; and the ‘Medium’ when there’s only one component, like bark)
What comes to brands.. I tend to use different brands, but brands like “Better-Gro” and “rePotme” are safe options. More people have asked about different brands, so I’ll be adding some examples on this website soon, under “Resources” page. 🙂
Hi. I have 2 orchids and it’s prob time to repot. I bought a bag of the Better-Gro potting mix and 2 of the pretty ceramic pots with the holes in them. My question is this : do I get a larger clear plastic thing , repot, then just stick inside the pretty pot OR do I place the orchid directly into the pot with holes and stuff the mix into that , leaving out the clear plastic pot ? I keep the plants in my master bathroom where there is a lot of indirect sunlight. I’m in Houston so def can’t leave them outdoors.
Hi Andree
Usually people put the orchid and potting mix directly in those ceramic pots – no plastic pot inside.
The roots can grow attached to the ceramic over time though, so removing it one day can be a challenge. (You can end up breaking roots or the pot then)
Is your watering regime under control? The clear plastic pots allow to see exactly when it’s time to water again. If that’s something you need then just keep the plastic pot inside the ceramic one!
Happy repotting!
/Irene
My orchid has no roots but has a lot of air roots. I didn’t realize the roots were all gone until I went to transplant it. I think I made a mistake as I put the air roots in to the medium. Please let me know what I should have done. I did the repotting today so hopefully I didn’t damage it more than I already did by killing all the roots. It’s a few years old and my first try at keeping an orchid alive. Well trying to.
Thanks
Hello Julie
Sorry to hear about your orchid! But these things happen.
I think now that you repotted the orchid it’s gonna be fine.
The aerial roots will adapt to the potting medium.
Just make sure to water correctly – not too much, not too little.
And keep it in sunlight but without getting burned!
Good luck.
/Irene
Hi!
I was wondering what to do if I’m having a hard time spotting my orchid’s roots inside it’s pot in order.to know whether it needs to be watered. It has many aerial roots.
Thank you for your help
Hi Maya
If you can’t see the roots, then just look at the potting medium. That’s enough to know when it’s time to water again! (Assuming the orchid is in a clear plastic pot, of course) So just lift up the pot and take a look; check the mid- and bottom part of the potting mix, is it still wet/moist/humid? You want it to dry almost completely, and then immediately water again.
If you’re using a pot that’s not clear, then you could gently stick your finger in the potting mix, feel how dry it is. But for people still learning about orchids, I’d absolutely recommend clear plastic pots – they make it SO much easier! 😊
you mentioned packing peanuts; can u break up a standard piece of foam that i have from a package i just received, or is the material different from that of the “peanuts?”
thanks for your time. newbie orchid grl
Hi Tami, newbie orchid girl 😊
Sure, if it’s normal styrofoam, then it works the same!
Hi Irene,
Your post is just what I needed, clear and easy to read. In fact it made me feel confident enough to go straight off to repot my Orchid that isn’t currently in bloom! It was fun to do, as you said, and I know I won’t be nervous when it comes to re-potting my others so, THANK YOU!
I have to add that I have three in total, all gifts from younger family members over the past two years and on receiving each one I felt terrified that I’d kill it but I appear to have been very lucky. If I get another my attitude will now be, ‘bring it on!’ 🙂
Thanks again. 🙂
Hi Dexygirl
How wonderful! I’m so glad the article gave you the courage to repot! Now that you’ve repotted one, you have no problem repotting the next ones! I do remember feeling the same when I first got into orchids, and there was no help around so I had to figure it out by myself. That’s what made me start this blog too, to share all the tips and info with people like you! 💚
As you’ve managed to keep your orchids alive already for 2 years you’re obviously doing a good job – so keep up whatever you’re doing! And more help is here on this blog. Thank you again for your lovely comment, I really appreciate it! Have a beautiful day. 💚
Irene
Hi Irene,
We too have saved an orchid from a supermarket’s rubbish bin. It was well and alive but had no bloom. We did this (the lack of any knowledge about the orchid contributed to this decision) – plotted it in the soil mix. This was one yer ago. In May of last year the orchid bloomed for 5 months. It has no flowers at the moment. It also grew a new leaf and extended one of its its air root. We also used some “plant feed” that you spay in the soil. However, the older leaves are now floppy and hanging down. We now want to report the orchid properly and will buy the normal mix it needs. Does it need more water? Thank you.
Hi Lana
Well done for saving the orchid! It’s so sad shops throw them out – perfectly fine plants! 😢
Sounds like your orchid has been thriving with you! What comes to the older leaves hanging; it’s normal for the older leaves to shed from time to time. As long as it’s only 1-2 of the older leaves, you should have nothing to worry about. But if the other leaves start to droop too, then it’s time to worry. See here;
“Why Are My Orchid’s Leaves Drooping”
Always pay attention on the overall health of your orchid. If the leaves are firm to touch, it’s getting enough water.
Good luck with the repotting! 😊
/Irene
My orchids need to be repotted, but I don’t want to go to the expense of buying larger pots, I like the ones I have. Can I gently trim the roots and replace the potting medium?
Hi Robey. Yes, you can reuse the old pot! Most likely when you get to the repotting, there’ll be some bad roots to trim off anyway, so they should fit back in the original pot. And if not, then yes you can trim them a little.
Thanks Irene , I am new to growing orchids and find your blog very helpful and informative.
So glad to hear that, Robey! Thank you.