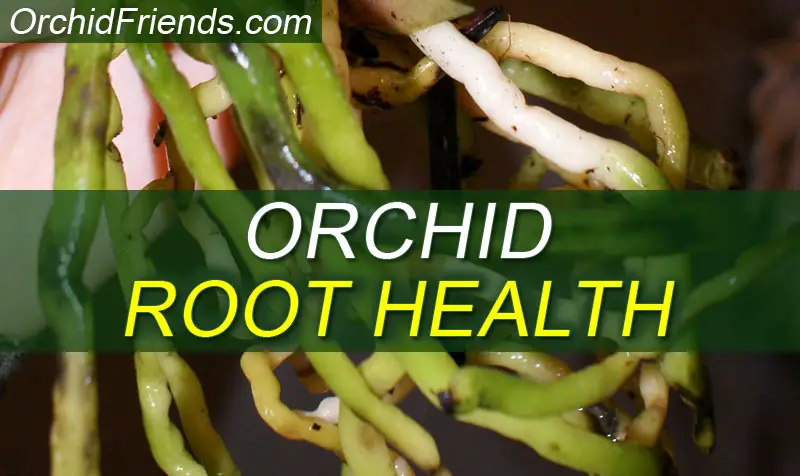
 Isn’t there a saying “Roots are the way to an orchid’s heart”? Or something along those lines… 😉
With the Phalaenopsis orchid, people tend to pay the least amount of attention to the roots. This is of course understandable as it’s the part that’s not visible to the eye, unlike the leaves and flowers are.
But truly, good root condition is essential in your orchid’s overall well-being. So let’s talk about roots!
What supports good orchid root health?
- Proper airflow
- Sufficient watering
- Good water drainage
- Nutrients
- Suitable orchid potting medium
The root system is the lifeline of your orchid. It absorbs and delivers water and nutrients to the upper parts of the plant.
In the nature the roots would also have another function; to keep the orchid attached to its growing surface.
The Phalaenopsis orchid is an epiphyte; a plant that grows higher up attached to trees and rocks – not in the ground, with its roots covered deep in the soil.
It uses its roots like ‘hands’ wrapping them around the growing surface, and holding the plant firmly on its place even during heavy storms.
Even though in home conditions the roots are hiding inside the pot it doesn’t make them any less important. Quite the opposite, in fact!
Anatomy of Phalaenopsis Orchid Roots
Inside the orchid root, there is a little string-like part that is called the vascular cylinder. This is the actual root. It transports water and nutrients to the upper parts of the plant.
Around the vascular cylinder is what’s called the velamen. This is the chunky part of the root that’s visible to the eye.
The function of the velamen is to absorb moisture and nutrients from the environment. The vascular cylinder then transports whatever amount is needed to the plant, and the rest is stored in the velamen for future use.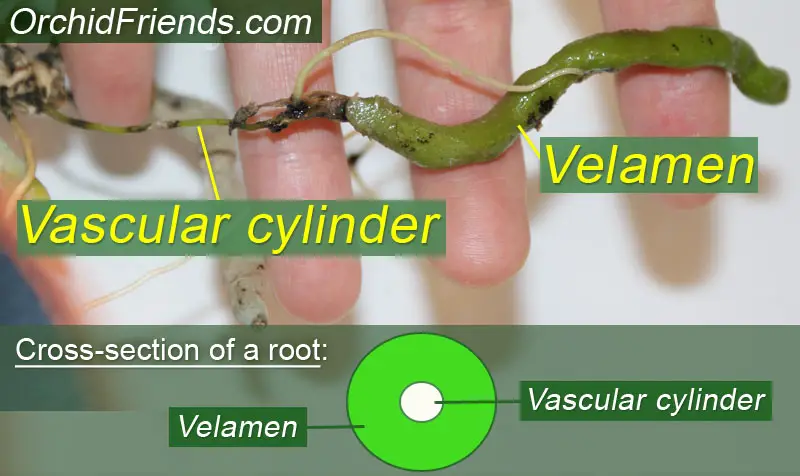
The appearance of Orchid Roots
Healthy Phalaenopsis orchid roots are firm to touch. You can gently squeeze them with your fingers; there shouldn’t be any softness or sogginess.
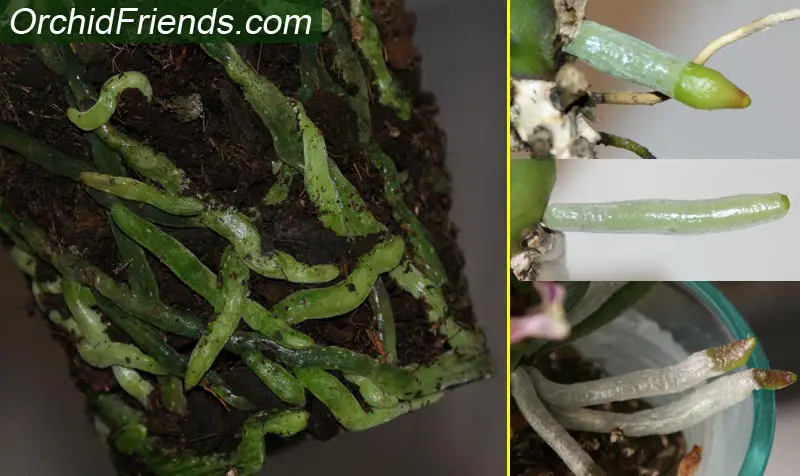
They’re green to silvery in color. It’s the velamen that gives them that silvery appearance. In addition to that, when roots start to become dry they start to turn grey/white. Watering them turns them green again.
The roots contain chlorophyll, which is what produces the color green when in contact with sunlight. Roots deep in the potting media that are never exposed to daylight don’t get to photosynthesize – in other words, they don’t get to turn green, but are light yellow to white in color. This is nothing to be concerned of.
The root tips can be slightly darker green and sometimes even slightly purple, which is perfectly normal.
Behavior of Orchid Roots
Phalaenopsis orchid roots are quite happy in smaller spaces. As long as they fit inside the pot with some potting medium, they do just fine.
In nature, as I mentioned above, the roots wrap around the growing surface and are always visible. The plant grows sideways, partly hanging down.
Under home conditions, we grow these orchids standing upwards, with the roots tucked inside the pot. This growing method results in two different types of root growth; the ‘normal’ roots that are in the potting medium, and aerial roots (or ‘air roots’) that grow outside the pot, sticking through the air.
All new aerial roots grow away from the light source. The leaves and flower spikes grow towards the strongest source of light, and the aerial roots to the opposite direction. This is because in the nature, the growing surface is located there –’behind’ the plant– which the roots are seeking to attach themselves to.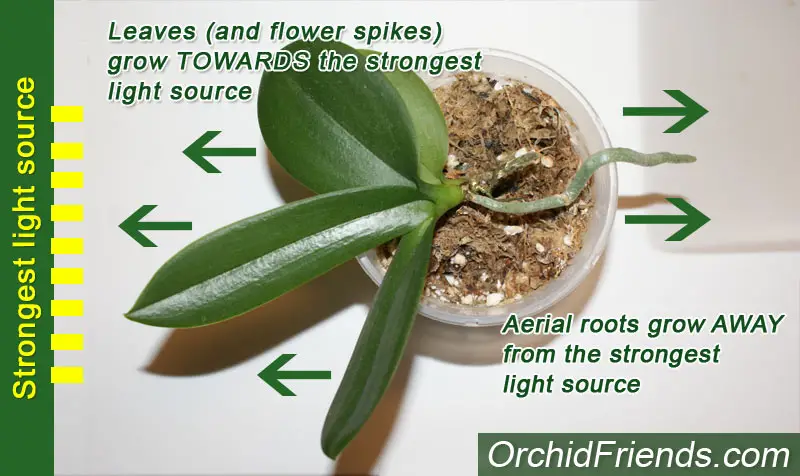
The active growth period for roots is during the orchid’s “vegetative stage” – it kicks off when the blooms have finished and fallen off. The plant switches from focusing its energy on growing spikes and flowers, to growing new roots and leaves. Both growing stages are just as important.
Fun fact; There’s no such thing as “aerial roots” in nature – all Phalaenopsis roots are the exact same type of roots. But thanks to the way we grow these orchids at home, we have just ended up with two “different” types of roots; the ones that grow inside the pot, and the ones that grow outside the pot. 😉
Problems with Phalaenopsis Orchid Roots
#1 Black root tips.
The root tips should never be black – this indicates a problem, like over-fertilizing. It’s better to under-fertilize than over-fertilize, or you will quickly run into problems. Over-fertilizing burns the roots.
You can read more about fertilizing HERE.
#2 Mushy roots indicate rotting.
They’re soft to touch and easily fall apart when you squeeze them. There might be a funky smell. This is caused by too frequent watering or potting media that takes too long to dry.
The orchid potting media should allow water to easily flush trough, and to allow proper airflow inside the pot. Remember, as this orchid is an epiphyte (a plant that lives “in the air”) its roots need air to breath. Also, it’s crucial to have drainage holes in the pot, so use suitable pots!
#3 Dehydrated roots are caused by under-watering.
They are dry to touch and lifeless. Even though the potting mix needs the drying period between waterings, the roots start to dry up if they’re not watered often enough.
“Often enough” varies depending on the season, the type of potting medium, the size of the pot, and even the orchid itself etc. So always keep an eye on the potting medium; as soon as it looks dry, it’s time to water again.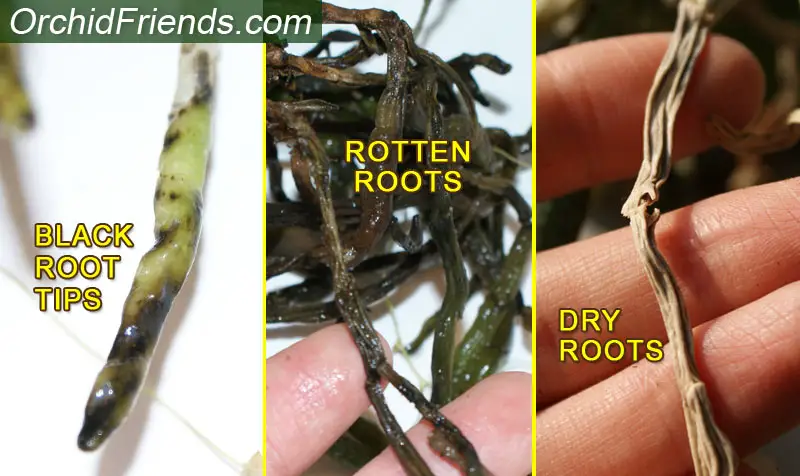
#4 Red dots on roots.
There shouldn’t be any red dots on your orchid roots. This is most likely fungus (fusarium). This is caused by too wet conditions.
Clean the roots by cutting off all bad (mushy) roots. Rinse the remaining roots with lukewarm water and spray with Hydrogen Peroxide 3%.
Repot using fresh orchid potting mix, and make sure not to over-water your orchid. (See here how to water your orchid) You can also treat fungus issues with Systemic Fungicide.
Another option for red dots on your orchid roots is false spider mites. In this case the dots would look more like fine rusty-colored dust. False spider mites are a serious pest. They spread fast to your other orchids and are hard to get rid of.
I lost my whole collection to false spider mites a few years ago, even though I tried everything to tackle the infestation – even dipping my orchids in a mild bleach solution. 😓
#5 White fuzz on orchid roots.
Have you sometimes seen a coating of small white ‘hairs’ on your orchid roots? This is nothing to worry about. They’re just root hairs. In other plants their function is to absorb more moisture and nutrients from the environment. In Phalaenopsis roots, however, their job is to help keep the roots attached to the growing surface.
Make sure the white hairs aren’t white mold though. Mold is caused by too much humidity. Clean the roots by rinsing them in lukewarm water, and trim off all bad roots. Then spray the remaining roots with Hydrogen Peroxide 3%. After this, repot the plant using fresh orchid potting medium, and make sure not to over-water in the future.
#6 Root system growing out of its pot.
If the root growth is so big that it starts to push the whole orchid out of its pot, it’s time to repot! Use a slightly bigger pot. Normally you don’t need to upsize when repotting your orchid, because in most cases the roots fit back inside the old pot.
Keep in mind though; the new pot doesn’t have to be too big. As long as the roots fit inside the new pot, you’re good to go.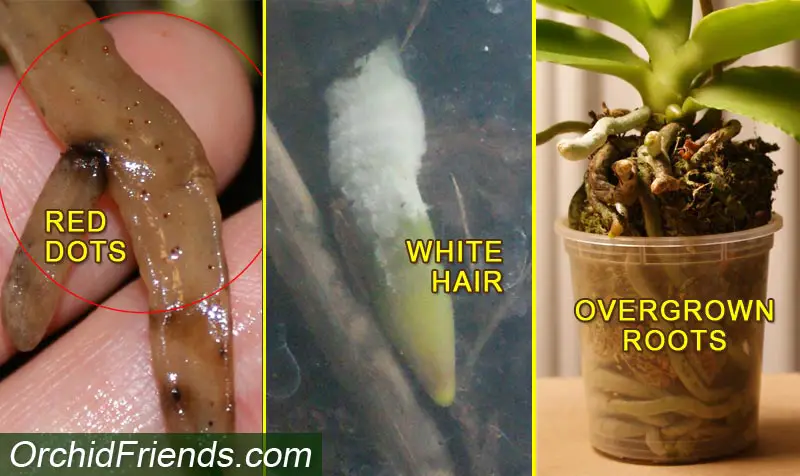
#5 Stunned root growth.
Sometimes the orchid roots are not growing enough. This can be caused by several factors; temperature, the orchid being stressed etc.
But there are ways to stimulate new root growth. One is by giving fertilizer to your orchid when it’s not in bloom anymore. Find a balanced orchid fertilizer, with the digits 20-20-20. These three numbers can vary from product to product, but the middle number stands for Phosporus (P), which is responsible for root growth.
Other ways to stimulate root growth is e.g. with black tea. Take some granules from a tea bag, and let them soak in water over night. There should be only a faint color in the water after the soaking. Then water the orchid with it.
Black tea contains Tannic Acid, which stimulates root growth. If you want to see more DIY ideas to enhance orchid root growth, please see HERE.
#8 Compacted orchid potting medium.
When the orchid is not repotted every two years or so, the potting medium can start to become compressed. This prevents proper airflow inside the pot, which the roots need. It can also prevent water from flushing through the pot freely.
In addition to that the potting medium becomes acidic, which in turn starts to burn the roots. This is why it’s important to keep an eye on the potting medium – if you see it become too compact then it’s time to repot! Otherwise the roots will start to suffer and die.
Always use suitable potting mediums for the Phalaenopsis orchid. It needs to be “breathable”, so you can’t use normal potting soil. I’ve written a whole article about different types of potting mediums which are suitable for these orchids.
#9 Extreme temperatures.
Orchid roots don’t like any extreme temperatures, too cold or too hot. So when you water your orchid or rinse the roots under a tap, make sure you’re doing this with lukewarm water. If it feels comfortable on your skin, then it’s fine for the roots too.
The same applies to air temperature. Avoid too hot and too cold temperatures.
#10 Live bugs in the roots.
Okay, there shouldn’t be any live bugs lurking around in your pot! So quickly identify what you’re dealing with. 🐛 Once you’ve found a match online, you know how serious it is. All pests are bad, but some are harder to get rid of than others! So take immediate action to eradicate them.
Silverfish are harmless, as are spiders. And the little “fruit flies” aren’t the end of the world either. But anything other than that is of concern, and needs immediate action!
Final words
I hope you learned something new about roots. Personally, I find my orchids’ roots just as exciting as the leaves and flowers! It’s fun to watch them grow, and it’s so satisfying to see healthy strong roots – more the merrier! 😍
If you have any comments, questions or stories regarding Phalaenopsis orchid roots, please leave them in the comment section below. I’d love to hear from you. 😊
Thanks for reading! Until next time, take good care, orchid friends! ✨

I didn’t learn only something but a lot, great pics, too! Many Orchid-thanks! 🙂
Hi Anna. Glad to hear that. Thanks for reading! 💚