** This post is written and edited by a human being **
Good orchid potting medium is key to keeping orchids successfully. Luckily, there are many options to choose from these days! One great potting medium for Phalaenopsis orchids is coconut husk chips. It’s a sustainable option, and great if you want the potting medium to retain water for a longer time than bark pieces.
Remember, there’s no one fit-for-all orchid potting medium. What works for one person might not work for someone else. The climate, location of your orchids, your indoor air and watering routines, the pots you use, and even the orchid itself are some of the factors that affect which orchid potting medium works best for YOU.
So if you’re interested in coconut husk chips as an orchid potting medium, or are just looking for something new to try, then I absolutely recommend you to go for it. See if it works for you and your orchids!
Below we’ll discuss in more detail how to use coconut husk for orchids, what are the pros and cons. And answer a few other frequently asked questions about different potting soils.
So, how do you plant orchids in coconut husk? Buy coconut husk chips online or locally. Hydrate the needed amount by soaking overnight in water. Plant the orchid in a clean pot using the coconut husk chips as the potting medium.

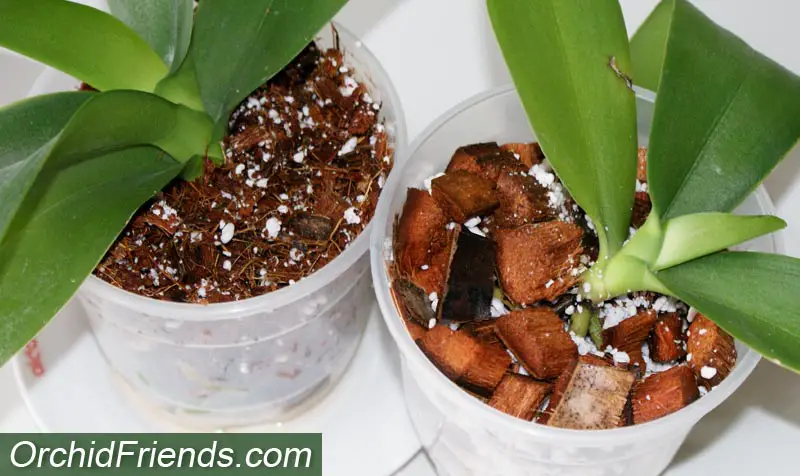
Growing Phalaenopsis Orchids in Coconut Husk
Many orchid growers swear by coconut husk chips as their go-to orchid potting medium. As you already probably know, orchids are ‘epiphytes’ – plants that grow higher up attached to tree trunks and other surfaces. Therefor, their roots need air to breath to ensure the plants stay alive and healthy.
When growing orchids indoors, we must mimic this by offering the orchid a growing medium that is breathable and allows water to flow through freely. A growing medium that retains enough water to hydrate the roots, without making them soggy.
So, why is coconut husk a suitable medium for growing phalaenopsis orchids? Coconut husk is a coarse cut material that promotes proper root aeration. It also promotes water and nutrient retention, plus good water drainage.
Coconut husk absorbs more water, which means the medium will be wet, but the plant will not sit in water. As such, coconut husk allows the potting medium to stay moist for a longer time than bark pieces, which is needed in some growing conditions.
Other benefits of coconut husk include:
- Rich in lignin content making it resistant to fungal and bacterial growth
- Can be used continuously for more than ten years
- Plants are free from soil-borne pests
- Requires less maintenance
- Reduces the labor and garden maintenance
- Allows the natural control of pests, diseases, and weeds
- Economically feasible
To grow your phalaenopsis orchids in coconut husk, follow these 4 steps:
Step One – Buying Coconut Husk Chips
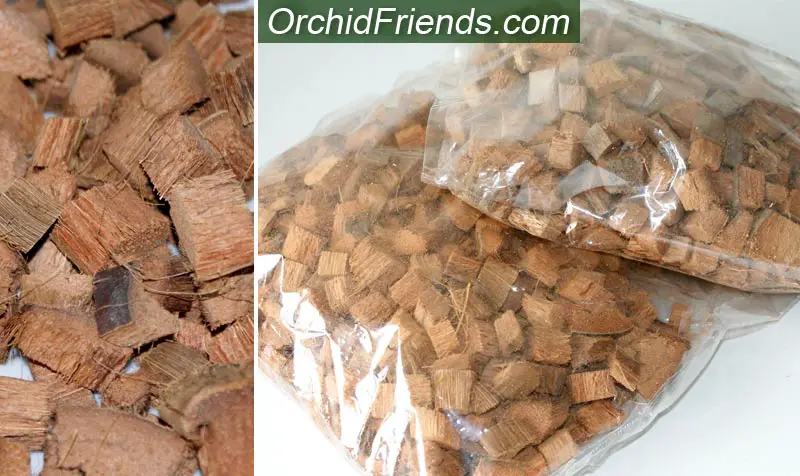
You can find high-quality grade coconut husk chips at a local garden center or nursery. Alternatively, you can shop for the same – coconut husk – from an online store. If you choose to buy from an online store, make sure the vendor is quality strict and transparent, so you can trust the quality of the products.
I’ve ordered several bags of coconut husk chips from online, because I can’t find them locally. They arrive in a plastic bag, and I’ve never had any problems with any of my orders. Of course I always inspect the chips before use.
Many vendors sell compressed coconut husk blocks. This is a popular form of potting medium for phalaenopsis orchids, especially as they are so easy to ship and store. You can also find the pre-washed husk chips in bags though, but it’s always good to have more options to choose from.
You may come across vendors selling pre-cut coconut husk chips that are very fine. This type of medium is OK for pots up to 4 inches, and especially if you need it for mini Phalaenopsis orchids. But for containers from 6 inches to 10 inches, fine coconut husk will retain too much water.
Too wet potting medium will lead to root rot and ultimately kill the orchid, so you want to avoid potting medium that takes too long to dry in your environment. Remember that the finer the medium, the longer it will take it to dry.
What you should know is that coconut husk chips work great in all types of potting mixes or stand-alone. Individually wrapped bricks are usually neatly packaged and compressed for easier storage.
At the store, you will find small grades – ¼” to ½” and medium grade – ½” to ¾” individually wrapped bricks. You may also find individually wrapped bales available in the same grade plus large grade – ¾” to 1”.
You can always buy both fine and coarse grade coconut husk chips if you’re not sure what to go for. Then you can use them both as needed, either separately or mixed in together.
Step Two – Pre-treatment
** This step applies only to coconut husk that has been picked up along beaches and isn’t pre-treated. (They have high salt content)
When you order/purchase your coconut husk the package should clearly state if it’s ready to use. But if it doesn’t state it for some reason, and you can’t ask the seller about it, then it’s better to pre-treat it just to be on the safe side.
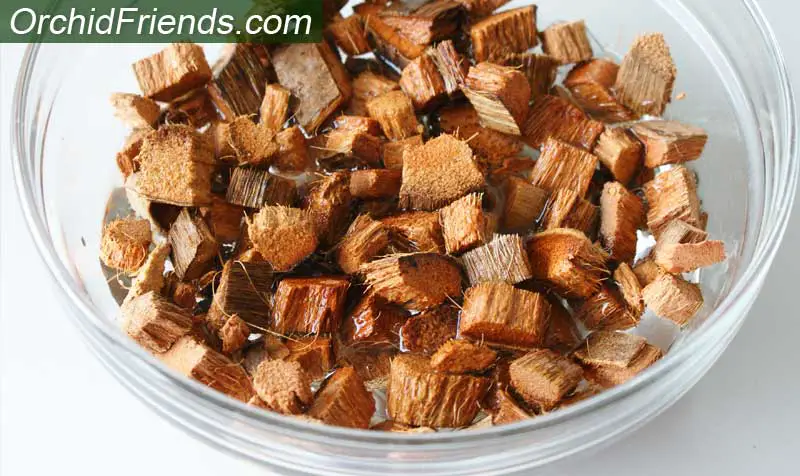
Before using the coconut husk as your growing medium, you need to soak it in water. People usually soak their coconut husk chips for a few days before use. This helps to ensure that the excess salt and tannin in the husks get dissolved in the water.
Coconut trees thrive well in saline coastal areas. As such, the intake of salt is present in all parts of the coconut trees, even the coconuts. What you need to know is that the excess salt can hurt the roots of the phalaenopsis orchids. Therefore, the coconut husk chips require a thorough rinsing.
After the coconut husk chips have been soaked and rinsed enough times, and are entirely expanded, then they are ready for use.
Step Three – Prepare Your Potting Mix
You can create different potting mixes to fit specifically your orchids’ needs and environment. Finding the perfect mix can take a lot of experimentation and trial-and-error.
To prepare your potting mix, you can use the following recipe:
- 2 parts coconut husk chips
- 1 part perlite
- 1 part charcoal
This type of mix works well for indoor phalaenopsis orchids. (Perlite provides additional aeration, and charcoal helps with the PH levels and to filter impurities)
Once you prepare your potting mix, soak it overnight in water. As mentioned above, never plant your orchids in a dry coconut husk potting mix.
By soaking the potting mix overnight, you ensure it absorbs enough water, which is essential for the growth of the orchids.
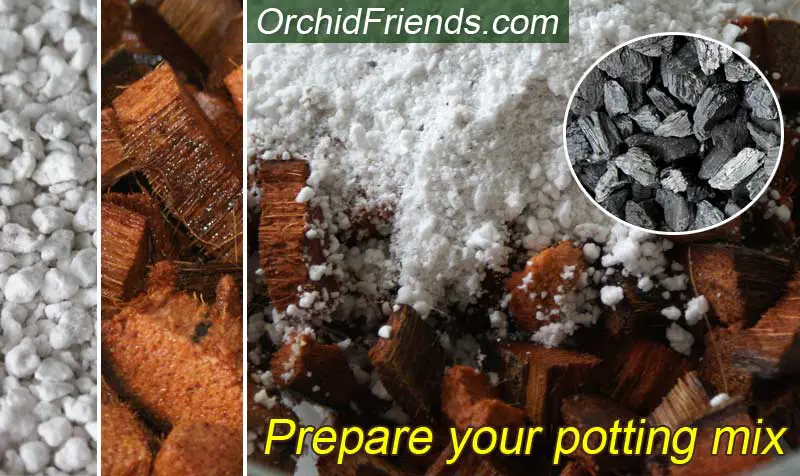
Alternatively, you can prepare a potting mix of fine and coarse coconut husks. Soak the fine and coarse coconut husk potting mix in water to reduce the stiffness of the raw coconut husk.
Step Four – Planting Your Phalaenopsis Orchid
Now that you’ve prepared the potting mix, the time has come to plant your orchid. Take your orchid from its original container, rinse the roots with lukewarm water, and trim off any bad (dry or mushy) roots with sterilized pruners or scissors. Spray the roots with Hydrogen peroxide 3% (optional). Plant the orchid as normal in a clean pot, using the new potting mix.
After you’re done with the repotting, water the potting mix to allow the coconut husk mix to settle into place. Now let the plant be until the next time you need to water it again.
Remember, it is important to allow the potting medium to dry before watering your orchid again. Over-watering will ultimately kill your orchid. As an orchid grower, if you constantly find dry or mushy roots in your orchids, then you should revisit your watering habits.
Before you water the orchids, lift them up and feel how heavy they are. While the coconut husk appears dry at the top, it could still be wet at the bottom. You can also check the moisture level by sticking your finger into the pot.
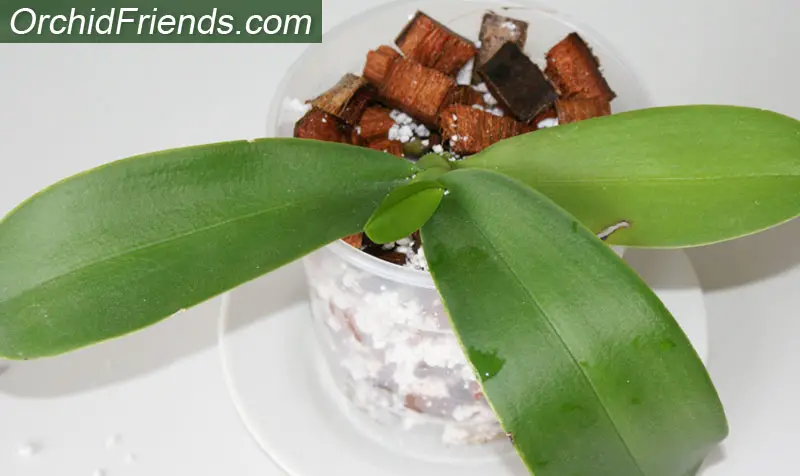
Alternatively, if you’re using clear plastic pots then you can easily observe the medium through it – are the bottom chips still moist? If they are, you don’t have to water the plant yet.
Making your own Coconut Husk chips
Yes, you can make your own chips too. All you need is coconut shells and tools to break them with. Use a box-cutter to remove the thin peel of the husk. Break the shells into the desired chip size. After this, let them soak in water for about 7-10 days. Change the water every 2-3 days.
This can be time-consuming, but surely a rewarding project. And especially if you have coconut shells at hand! Would be a waste to just throw them out if you have use for them.
Other uses for Coconut Husk
Some people use coconut shells as ‘pots’ for their orchids. I’ve never tried how they work with indoor orchids, but if you want to try this yourself, I recommend you drill some holes in the bottom of the shell for drainage!
Also, drill 2-3 holes on the sides so you can hang the shell with some string or wire from the sealing/shelf. They make really cool looking pots! For outdoor growers in tropical climates, they work great.
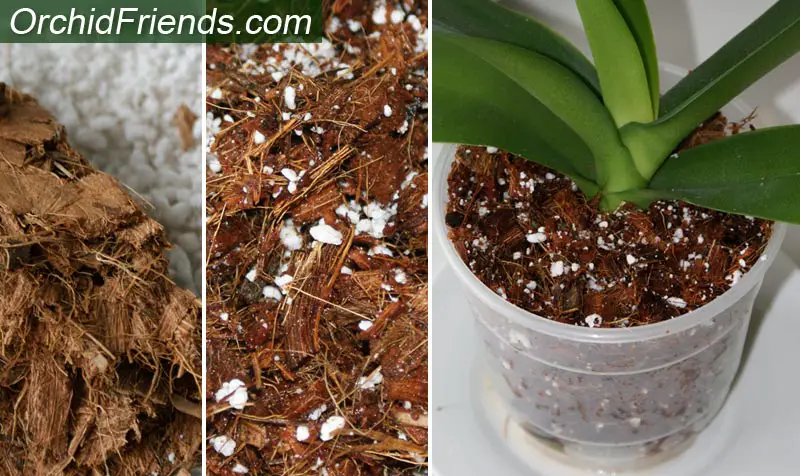
Coconut husk fiber (coir) can also be used for orchids. If you have smaller plants, like mini phalaenopsis orchids or a keiki that needs separating from the mother plant, then coconut fiber is an option worth considering. You can use it similarly to sphagnum moss. It tends to become quite compact though, so mix something like perlite or even packing peanuts in it for aeration, and especially if you’re using bigger amounts of it!
People also line wire baskets with husk fiber, and put their orchids in them with bark etc. Other uses for husk fiber is for mounting orchids.
Can You Use Regular Soil for Orchids? 🌷
No, you cannot use ordinary soil for orchids. In fact, it can kill phalaenopsis orchids to use ordinary soil as their potting medium – it will suffocate the roots! Orchids aren’t difficult to grow and maintain, but they need the correct planting medium, light, moisture, drainage and fertilizer.
Just always remember that orchids are epiphytes. They are plants that grow higher up on surfaces of tree trunks etc,. and drive nutrients and moisture from air and debris accumulating around them. They do not live on the ground with their roots buried in soil, as terrestrial plants do.
Therefore, because orchids do not have the same roots as terrestrial plants do, ordinary soil is not suitable for growing orchids. There are some orchid types that are terrestrial, but Phalaenopsis orchids aren’t one of them.
Ordinary soil drains very slowly. As such, the orchid roots will receive too much water and less air leading to the roots to rot and die. Aeration, moisture, and stability are the key to happy and healthy orchid roots.
Naturally, orchids grow in places with high rainfall. While they require plenty of water, they do not need stagnant water. The best potting medium for orchids should always have excellent drainage, which normal potting soil doesn’t have.
Potting mediums like coconut husk and bark pieces are best for orchids thanks to their excellent drainage and aeration.

Can I Use Cactus Soil for Orchids? 🌵
Cactus soil provides dry conditions that favor cacti. It mimics the natural, gritty low nutrient soil found in arid areas. It has superior drainage and dries quickly after watering.
If you’ve used cactus soil for your indoor cacti, you know how dry it quickly becomes – this is too dry for orchids. And not only that, but cactus soil is also too compact for orchid roots. The roots need to breathe! So I don’t recommend using cactus soil for your orchids. It’s pretty much the exact opposite of what Phalaenopsis orchids need.
If you’re determined to test it though, then you could try mixing it with something that provides aeration to it – like perlite. Perlite would prevent cactus soil from becoming too compact.
I don’t know how orchids would thrive in this potting medium, and how frequently it would have to be watered. But if you want to try it just for the sake of it, then mix 1 part cactus soil with 4 parts perlite. That should break up the soil enough.
How to Plant Orchids in Water 💦
The concept of water culture can sound like it’s from science fiction if you are new to growing plants hydroponically. What you need to know is that hydroponics has been around for many years. Ancient cultures have grown different crops using the hydroponics method.
Such crops include vegetables and herbs, among others. Today, hydroponic systems are very popular. One of them is water culture.
What Is Water Culture?
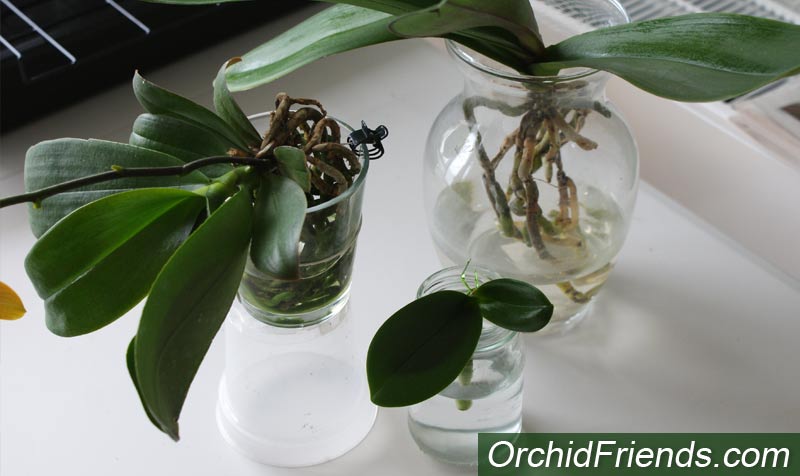
Water culture is a hydroponic system of plant production that involves the suspension of plant roots in soft water. In water culture, no substrate growing medium is used – all you need is water. The plant’s roots literally suspend in the water all the time (24/7) or in cycles of wet and dry days.
For the system to work you need a container to hold the water – any kind of clear glass vase or jar will do as long as it has a wide enough opening. You want the air to easily move in and out of the container, and for the leaves to rest on the rim.
Also, make sure the roots fit inside the container easily. It’s better to have too much space than too little, because you can just always add more water to reach the roots.
There are three different ways to do water culture. The first is “Full Water Culture” (FWC). In this method, the orchid is kept in the water all the time. It gets very few ‘dry-outs’ (a time when the water is removed so the roots can dry) – maybe once a month, a few times a year, or never.
About 1/3rd of the roots are covered in water. As the water evaporates, the shorter roots absorb the humidity from the air. More water is added as needed to maintain the same water level.
Due to the constant presence of water, FWC can lead to bacterial growth. This is why some people add some charcoal in the water, to help filter and purify it. But with this method, you should always keep an eye on possible bacterial growth.
Some orchids take on to this method quickly, while others struggle to adapt. All orchids are different.
The second water culture method is “Semi-Water Culture” (SWC). In this method, the orchid alternates between dry and wet days. The amount of days depends on the environment and the orchid, but it could be for instance; 3 wet days followed by 2 dry days; or 2 wet days followed by 5 dry days.
Once you find out how many wet and dry days your orchid needs, then this cycle is constantly repeated.
Semi-Water Culture takes more effort to upkeep than Full Water Culture, because of the frequent cycles of wet and dry days. But it mimics Phalaenopsis orchids’ natural environment; periods of rainfall and no rain.
SWC has a lower risk at bacterial growth and root rotting, thanks to the roots getting a chance to dry out.
But, as mentioned earlier, orchids are different. One orchid might take on to Full Water Culture immediately, while another prefers Semi-Water Culture. And some orchids don’t like either, preferring to grow in bark instead!
The third water culture method is called Semi-Hydroponic. In this method, something such as Leca pebbles or Lava rocks are added in the container. Water reservoir is added just below the roots. If the container is made of plastic, you can add a few air-holes just above the water level. In this method, the roots don’t touch the water itself but suck in the moisture from the clay pebbles or lava rocks.
But YES, it IS possible to plant Phalaenopsis orchids in water too! To grow your orchids in water, unpot the plant, remove the medium (bark bits and moss) and gently rinse the roots. Using sterile pruners, cut any rotten/dry roots, and now, your orchid is ready for the water. The container doesn’t have to be too big, but should still provide enough room for the roots to grow.
You can read more about orchid water culture HERE.
How to Plant an Orchid Keiki
There are two ways to let an orchid Keiki to grow. You can detach the keiki from the mother plant, and place it in its own container, 4 inches deep, filled with fir bark or sphagnum moss. (Do not use regular potting soil.)
The other method is where you leave the Keiki attached to its mother. By allowing the Keiki to grow this way for the first year of its life is beneficial. This is because the adult plant regulates all the nutrition for the young Keiki. This way the keiki will also grow faster than by itself.
Start by pre-moistening your potting medium but do not saturate it. Place some of the moss in the pot. Cut the keiki with a piece of the spike it’s growing from, about an inch above and below the keiki. Place the keiki with the piece of the spike on the moistened moss, and cover some of the roots gently with some moss.
Keep the moss moist at all times, and add fertilizer to the keiki. Always observe your plant carefully to check its continued health and growth, and keep it away from hot sun! (Keikis are sensitive)
Final Thoughts
Coconut husk chips make an excellent potting material as they are light and absorbent. They act as a reservoir by holding the right amount of moisture for your orchid plants. I have several growing in coconut husk chips right now. I like to experiment with different potting mediums!
Apart from coconut husk, you can try water culture. This method allows you to have a different kind of orchid experience. No need to repot, ever! And there’s a lower risk for pests. You could try with just one Phalaenopsis orchid first and see how it goes. It might not be your thing, but you won’t know for sure until you try it for yourself.
Thank you so much for reading. If you have any questions or comments, please leave them down below! I always do my best to personally read all the comments.
Until next time, orchid friends – take good care! 🌼


